Wireless network access can be secured using Wi-Fi Protected Access
(WPA) as defined in the IEEE 802.11i standard and/or using IEE 802.1x
authentication. (WPA requires 802.1x authentication, but 802.1x can be
used without WPA.) To implement WPA, wireless clients and wireless
access points must support 802.1x authentication. If a RADIUS server is
not used for authentication, 802.1x can be supported by a shared secret.
However, a more secure solution is to use a RADIUS server. IAS server
supports 802.1x authentication and its configuration is discussed here.
Support for WPA and 802.1x is available for Windows clients.
Table 1 describes the support for 802.1x authentication and WPA in Microsoft products.
Table 1. 802.1x and WPA support in Microsoft Products
| Product | Details for 802.1x | Details for WPA |
|---|
| Windows Server 2003 | Group Policy can be used to configure client settings. | Obtain from Microsoft and install the WPA client. Obtain network card driver and firmware updates as necessary. |
| Windows XP | Group
Policy can be used to configure client settings (SP1 and above). A
wireless update download is available (see KB article 826942). | Windows
XP SP1 or later; obtain and install the Windows WPA Client. Obtain
network card driver and firmware updates as necessary. |
| Windows 2000 | SP3 or later and the Microsoft 802.1x upgrade for Windows 2000 or SP4. | Obtain and install a new WPA-compliant configuration tool from the wireless network card adapter. |
| Pocket PC 2002 | N/A | N/A |
| IAS Server | Windows Server 2000 with SP4 or later, and Windows Server 2003. | N/A |
| Windows 98, Millennium, and Windows NT 4.0 Workstation | 802.1x client support available for Microsoft Premier and Alliance support customers only. | N/A |
Authentication is a
major component of secure access to wireless networks. While there are
several choices that can be used for authentication, the use of Extensible Authentication Protocol (EAP
) or Protected EAP
(PEAP), and the 802.1x authentication process is the best solution. An
understanding of the EAP, PEAP, and the 802.1x authentication process is
necessary to correctly implement them. Many installations fail simply
because of lack of knowledge about these protocols.
1. Understanding EAP and PEAP
The 802.1x
IEEE standard for network port authentication defines how EAP can be
used for authentication by IEEE 802 devices including wireless access
points and Ethernet switches. The standard uses the IETF RFC 2284, PPP Extensible Authentication Protocol (PEAP). Only EAP authentication types are supported. To use 802.1x the following components must support 802.1x and PEAP:
EAP is flexible and extensible, but does not encrypt the authentication
channel. Therefore, it might be possible for a malicious user to capture
and analyze successful authentication and possibly gain information
that might assist in an attack. For example, if password protocols such
as the Challenge Handshake Access Protocol
(CHAP) that are susceptible to offline password cracking attacks are
used, the attacker might be able to crack the password of a valid user.
In addition, the attacker might be able to inject packets into the
communication and interfere with communications. PPP authentication
protocols select authentication methods during link establishment as
part of the connection validation. EAP does not use the authentication
mechanism during link establishment. Instead, authentication methods (or
the choice of an EAP type) are chosen during the connection and
authentication phase. However, when EAP is used for 802.1x,
communications authentication takes place before packets are encrypted
using the Wired Equivalency Privacy (WEP) protocol
.
PEAP encrypts the
entire communication (including the user authentication process). PEAP
uses Transport Layer Security (TLS) to create a secure, encrypted
channel. Messages are also checked for integrity. The channel is created
before the client is authenticated. When PEAP is used, even those
authentication protocols that are susceptible to attacks can be used
because the communications channel is encrypted before user
authentication takes place. Windows Server 2003, Windows XP SP1 or
later, and Microsoft 802.1x Authentication clients support PEAP-MS-CHAP
v2 and EAP-TLS as defined in RFC 2716, PPP EAP TLS Authentication Protocol. EAP-TLS is very similar to the protocol used in Secure Sockets Layer (SSL), the protocol used to authenticate and secure communications with e-commerce servers.
When PEAP-MS-CHAP v2 is
used, wireless clients do not need certificates, but the IAS server
does. If you have implemented a Windows Certificate Authority (CA) based Public-Key Infrastructure
(PKI), issue a certificate for the IAS server. However, if you do not
already have a PKI, you may use a third-party certificate for the
server. The client must have a copy of the root CA certificate
for the server's certificate to validate the digital signature of the
IAS server certificate. The certificate is used to authenticate the
client to server connection, and provide encryption keys for further
communications (including the user's MS-CHAP v2 authentication).
When EAP-TLS is used,
both clients and servers need certificates. Certificates may be stored
on the client computer or on smart cards.
Other
802.1x authentication schemes are Cisco's LEAP (which requires the use
of Cisco wireless access points) and EAP-MD5 (which is not recommended
for wireless communications). |
|
Third-party components can be used to provide the IAS server with support for PEAP authentication methods such as the use of token cards such as the RSA SecureID. (For more information, see the article Enterprise Deployment of Wireless and Remote Access with RSA Secure ID and Microsoft Internet Authentication Service at:
After authentication, 802.1x
generates dynamic encryption keys
that are used for WEP encryption. (The keys are frequently changed and
distributed to clients.) The use of dynamic keying for WEP mitigates one
of the major vulnerabilities of WEP. Because WEP keys can be cracked if
enough WEP messages are captured, frequent rekeying can reduce the
chance that this will occur.
EAP over RADIUS is not a
defined EAP type, but is the method by which EAP messages can be passed
by the NAS server to a RADIUS server for authentication. The EAP message
is included as a RADIUS attribute part of the RADIUS message. The NAS
server does not process the EAP message; the RADIUS server and the
origination access client do. After the RADIUS server has processed the
EAP message, it returns an EAP message encapsulated in the RADIUS
message back to the NAS server. The NAS server returns the EAP message
to the client that requested the connection.
2. Understanding the 802.1x Authentication Process
The 802.1x authentication
process is also referred to as port authentication
. This is because a two-port configuration is used. One port, the uncontrolled port,
is used for communications between the wireless access point and the
RADIUS server. Client communications are forwarded over this port. No
direct communications between the client and the RADIUS server (or any
other intranet resource) can use this port. The second port, the controlled port,
is available only to authenticated and authorized clients and is used
for communications between the client and the intranet over the wireless
access point. Communications required to perform client authentication
to the RADIUS server are proxied by the access point. The access point
is the RADIUS client.
There are three new 802.1x specific definitions:
Port Access Entity (PAE) or LAN port
This supports the
802.1x protocol that is associated with a logical or physical port. The
PAE can be either an authenticator or supplicant (or both).
Supplicant
This is a LAN port
used to request access to services through the authenticator. In a
wireless network, the supplicant is the LAN port on the wireless LAN
network adapter.
Authenticator
This is the LAN port
on the access point or NAS server that is used for communications with
the RADIUS server. In a wireless network the authenticator is the LAN
port on the wireless access point. The authenticator does not
authenticate the supplicant's request; instead it forwards the
supplicant's request to an authentication server (the RADIUS server).
The authenticator has both
an uncontrolled port and a controlled port. The uncontrolled port is
used for uncontrolled communications between the wireless AP and other
devices on the wired network (for example, RADIUS messages). A wireless
network client's frames are never forwarded through the uncontrolled
port. The controlled port does forward an authenticated wireless
client's frames between the client and the wired network. Think of the
controlled port as if it was an electrical switch. Until the client has
authenticated, the switch is open (no connection exists, electricity
cannot flow) and no client communications can be forwarded. After the
client has been authenticated, the switch is closed and data can flow
between the client and the wired network.
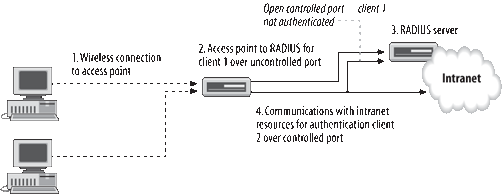
Figure 1
illustrates the controlled and uncontrolled ports on the AP. In the
figure, the uncontrolled port is communicating with the RADIUS server to
forward the connection request from client 1. The controlled port
logical switch is open. Another part of the controlled port is closed to
support communications for client 2. Client 2 has already been
authenticated.
The authentication server
is a server that checks the credentials of the supplicator on behalf of
the authenticator and returns the results (authenticated or denied) to
the authenticator. The authentication server can be a component of the
AP, in which case the AP must be configured with the user credentials.
In a wireless network, the authentication server is usually a RADIUS
server and the wireless AP uses the RADIUS protocol to send and receive
connection requests and results with the RADIUS server.
The authentication process follows these steps as illustrated in Figure 2:
The
access client uses its wireless network card and sends a connection
request to the wireless access point. The connection request includes
the user identity.
The
wireless access point acts as a RADIUS client and uses the uncontrolled
port to forward an Access-Request message, including the user identity
to the RADIUS server.
The
RADIUS server sends an Access-Request back to the wireless access point
requesting the user's credentials (user ID and password).
The wireless access point requests this information from the access client.
The access client provides this information to the wireless access point, which then forwards it to the RADIUS server.
The
RADIUS server performs an authentication check against either its local
database or AD, depending on how the RADIUS server is configured.
If the user credentials are valid, an Access-Accept message is returned to the wireless access point.
If the user credentials are not valid, the RADIUS server returns an Access-Reject message to the wireless access point.
If
the user credentials cannot be verified (a domain controller cannot be
located, for example), the connection request is dropped.
If
the wireless access point receives an Access-Accept message, the user
is allowed to communicate with the intranet using the controlled port of
the wireless access point; otherwise, this port remains closed.

3. Implementing 802.1x Authentication
To implement 802.1x authentication, three components must be configured:
It is also beneficial to
create a Windows custom security group whose members are those users who
are authorized for wireless access.
To configure the wireless access point, use the manufacturer's instructions.
3.1. Configuring IAS to support 802.1x authentication for wireless clients
To configure IAS to
support 802.1X authentication, the wireless access point is added to the
RADIUS server as a RADIUS client and a Remote Access policy is created
to manage wireless connections. If the RADIUS server does not already
have a certificate, one must be obtained and installed before the Remote
Access policy can be configured.
3.1.1. Configuring a Remote Access policy for wireless
The Remote Access policy should have the following configuration characteristics:
EAP authentication
The authentication
method must be defined for the policy. For wireless access, the first
choice made is between PEAP or smart cards. The use of smart cards for
wireless access requires the use of an EAP protocol. For wireless access
remote access policies, you will always identify a type of EAP
authentication.
Ignore dial-up properties attribute
When Remote Access policies
are evaluated, the dial-up properties of the user account are
considered. If call-back is configured, the wireless access point cannot
respond. Therefore, the dial-up properties must be ignored for wireless
connections.
Framed MTU attribute
This is used with EAP authentication. This informs the RADIUS server of the maximum transmission unit
(MTU) negotiated with the client. (The MTU specifies the largest IP
datagram that can be transmitted.) This prevents the RADIUS server from
sending EAP messages too large for the client to accept.
Tunnel-Pvt-Group-ID attribute
If a VLAN is used to manage wireless clients, this attribute allows specification of the VLAN ID.
To create the
policy, create a new Remote Access policy and then edit the policies
profile. Finally, remove the default Remote Access policy, or move it
down so the wireless access policy is evaluated first.
To create the policy,
begin by opening the IAS console. Right-click Remote Access Policies and
then click New Remote Access Policy. Then click Next. Enter a name for
the policy (for example, Wireless Access), then click Next. Select
Wireless and then click Next. Use the Add button and add the Windows
group representing users who are authorized to connect to the wireless
network. Then click Next.
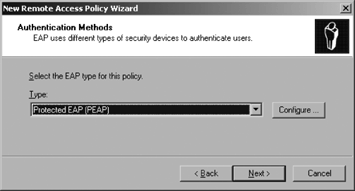
In the Authentication
Methods window, use the Type drop-down list to select a method. (You can
choose between PEAP or smart cards. The instructions that follow are
for the PEAP option.) Select Protected EAP (PEAP), as shown in Figure 3.
Click the Configure button next to the drop-down list box. Configure Protected EAP Properties, as shown in Figure 4.
The server certificate must already be present on the server. If
desired, check the Enable Fast Reconnect box. This box allows the server
and client to reconnect quickly when a connection is dropped. However,
it avoids some security checks and therefore might allow an attacker to
successfully hijack a connection between a valid client and the server.
For this reason, it is left blank in our example.
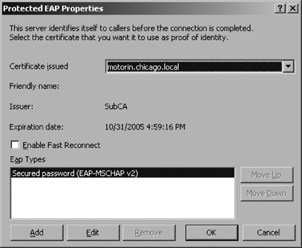
Use the Add button to identify the EAP Type allowed for this connection. Then click OK, followed by Next, and then Finish.
To edit the profile,
expand the Remote Access Policies node and double-click on the wireless
policy in the detail pane. On the Settings page, click the Edit Profile
button to edit the profile. Review the configuration settings and
compare them against network requirements (for example, modifying
acceptable encryption requirements or adjusting dial-in constraints).
Select the Advanced tab, as shown in Figure 5, and click the Add button to add an Attribute.
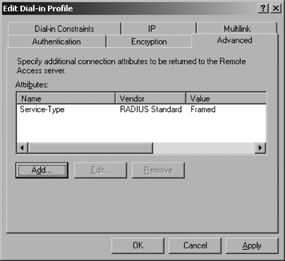
Scroll down and
select Ignore-User-Dial-In-Properties and then click Add. This property
is necessary to prevent the IAS server from processing user properties
that the wireless access point won't understand. The primary user
property that can cause problems is the Call-Back phone number listed in
a user account Dial-In properties page in Active Directory Users and
Computers. Click True and then click OK. Repeat this process for other
required attributes.
Examples of
attributes that may be required are those required for VLANs. If a VLAN
is used to manage wireless clients, add the attributes Tunnel Type
(select Virtual LAN (VLAN)) and Tunnel-Pvt-Group-ID (add the value of
the VLAN ID that contains the certificate server for the wireless
clients).
Click Close to return to the Settings page. Click OK twice to close the policy.
3.2. Understanding and fulfilling certificate requirements for EAP and PEAP
Client and server
certificates for EAP and PEAP must meet specific requirements. This is
true whether the certificate is produced by a Microsoft Windows CA or a
third-party CA. The requirements are listed here for reference
when planning your IAS/wireless deployment.
Specific certificate requirements for EAP and PEAP are as follows:
The client
certificate must be issued by a Windows Enterprise CA or be mapped to a
user account or computer account in the AD. (An Enterprise CA is
integrated with AD and automatically maps its issued certificates to AD
accounts.)
The user or computer certificate chains to a trusted root CA. (It is issued by the root CA or by a CA in the root CA's hierarchy.)
The user or computer certificate on the client includes the Client Authentication purpose.
The
user or computer certificate does not fail one of the checks performed
by CryptoAPI certificate store and passes requirements in the Remote
Access policy.
The
802.1x client does not use registry-based (stored in the registry)
certificates that are smart-card certificates, or that are protected
with a password. (Smart-card certificates stored on a smart card can be
used.)
The Subject Alternative Name extension in the client certificate contains the user principal name (UPN) of the user.
When
clients use PEAP with EAP-TLS and EAP-TLS authentication, a list of all
installed certificates valid for EAP-TLS are display in the
Certificates snap-in.
The
IAS or VPN server certificate must also be configured with the "Server
authentication" purpose (a certificates purpose designates how it can be
used. The server authentication purpose means the certificate can be
used to prove the server is who it claims to be). The object identifier
(an number which is used to classify an object) for server
authentication is 1.3.6.1.5.5.7.3.1.
The
IAS or VPN server certificate must have the name in the "Subject line"
of the certificate that matches the name configured on the client for
the connection.
For
use with wireless clients, the IAS or VPN server certificate must be
configured with the Subject Alternative Name extension containing the
name of the IAS or VPN server.
3.3. Using a Windows CA server certificate
If a server
certificate is required and a Windows Enterprise CA is present to
provide certificates for the domain, the Windows Enterprise CA may
already have issued a server certificate to the domain member IAS
server. Use the Certificates console to verify if this is so. If the CA
is not configured to automatically provide server certificates, a
certificate can be requested using the Certificates console. Third-party
certificates can also be used.
To verify if a
computer certificate from an enterprise CA is available, first create a
Certificates console for the local computer by adding the Certificates
snap-in to an MMC console on the IAS server. When the Certificates
snap-in is selected, a prompt for user or computer certificates is
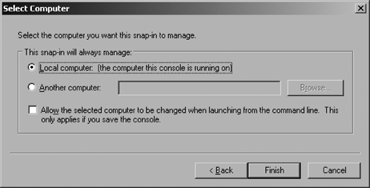
offered. Select the "Local computer account (the computer this console
is running on)" option, as shown in Figure 6.
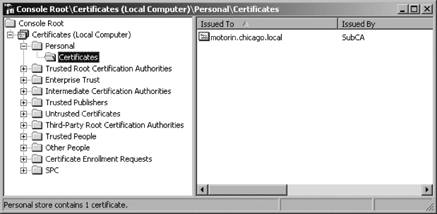
Check for the existence
of a server certificate for this computer. The certificate, if present,
is located in the Certificates (Local Computer) → Personal →
Certificates node of the Certificates console, as shown in Figure 7.
If a certificate is
not present, you must request a computer certificate. To request a
certificate, begin by right-clicking the Personal folder of the
Certificates console for the IAS server and then click All Tasks. Select
Request New Certificate and then click Next. The available certificate
types are listed. Select Computer for the Certificate types and then
click Next twice. Then click Finish.
Click OK in response to the prompt that the certificate request was successful.
3.4. Using a third-party certificate
By default, Windows
wireless clients already store a copy of the root CA certificates of
many third-party CAs. Purchase a certificate for the IAS server from one
of these CAs, and you will not need to configure the clients to trust
the IAS certificate. You may use another third-party CA, but then you
must install a copy of the CA's root certificate on every wireless
client.
To configure the server by obtaining and installing an IAS/PEAP server certificate from Verisign, follow these steps:
Obtain a certificate from Verisign.
If the certificate is automatically installed by the download routine, verify that the certificate is installed.
If a proxy server is used, add the proxy server information using the local security context.
3.4.1. Obtaining and installing a Verisign certificate
This procedure obtains
and installs a certificate from Verisign, but an Internet connection is
needed from the IAS server (including the ability to run scripts). This
additional risk can be avoided by obtaining the certificate using an administrative station
(a computer dedicated for this type of administrative task) and then
manually moving the certificate from the administrative station to the
IAS server.
Log in to the IAS server.
Alternatively (and to improve security), you can log on to an
administrative machine. Open Internet Explorer. Browse to the http://www.verisign.com/products/wlan/ Wireless LAN Server Certificates
web page. Click the Buy button to open the WLAN Server Enrollment for
Microsoft IAS Server page. Choose a validity period of 1 or 2 years.
Enter the information requested and be sure to enter your email in the
Enter Your Technical Contact Information text box on the page. Read the
subscriber agreement. If you agree to the terms, click Accept.
Check your email for a
message from Verisign that includes a URL and PIN. If you completed the
steps in the previous paragraph from an administrative machine, log on
to that machine. If you completed those steps from the IAS server, log
on to the IAS server using a local Administrator account. (This account
is used by the certificate installation program.)
Open Internet Explorer.
Browse to the URL listed in the email message. Enter the PIN from the
email message. Click Install. (The certificate is automatically
installed if the page is accessed from the IAS server.) If an
administrative machine is used, you must install the certificate
manually on the IAS server (as detailed in the following section).
Click the Yes button
when warned about a potential scripting violation. Use the Certificates
console to verify that the certificate is installed.
3.4.2. Manually installing the WLAN certificate
If the IAS certificate is
obtained using an administrative station, you must copy the certificate
from this computer to the IAS computer and then install it.
Click the Start button, click Run, enter mmc,
and then click OK. From the File menu, click Add/Remove Snap-in and
click Add. Double-click the Certificates snap in. Select the Local
Computer Account and then click Finish. Click Close. Use "File Save as"
to name and save the console as Certificates.
In the console,
expand the Certificates (Local Computer) node, expand Personal, and
click Certificates. Select the certificate that is issued to the name
you entered in the certificate enrollment process. From the Action menu,
select All Tasks and then click Export.
Click Yes, export the
private key, and then click Next. Click "Include all certificates in the
certification path if possible" and then click Next. Enter a password
to be used to import the certificate on the IAS server. Enter a filename
and then click Finish.
Log on with local
administrative privileges at the IAS server. Copy the file to the IAS
server. Create a certificates console as described at the beginning of
this section. In the console, expand the Certificates (Local Computer)
node, expand Personal. From the Action menu, select All Tasks, click
Import, and then click Next. Enter the name of certificate file (or
browse to its location and select it). Enter the password you created
earlier and then click Next. Ensure that "Place all certificates in the
following store" points to the Personal store, and then click Next,
followed by Finished.
3.4.3. Verifying the certificate is installed
If the certificate is
obtained from the IAS server, it is automatically installed. Use the
Certificates snap-in to verify the certificate is installed. Click the
Start button, click Run, enter mmc,
and then click OK. From the File menu, click Open. Double-click the
Certificates console you saved previously. In the console, expand the
Certificates (Local Computer) node, expand Personal, and click
Certificates. In the details pane, search for the Versign WLAN server
certificate.
3.4.4. Configuring proxy settings
The Verisign certificate
revocation list (CRL) source will point to a Verisign server on the
Internet. The CRL is necessary to check the certificate validity. If you
use a proxy server between clients and the Internet, then you must
configure IAS to use the proxy server. To configure proxy settings, use
the Internet Explorer Connections page LAN Setting page.
3.5. Configuring the Windows XP wireless client to use 802.1x authentication
Windows XP enables IEEE
802.1x authentication using EAP-TLS authentication by default for
LAN-based network adapters. The first step in configuring the XP
wireless client is to configure the wireless network adapter. Select
Control Panel → Settings → Network Connections → Wireless Network
Connection. Click the Advanced button. Click the Add button to add a
network. Select the Association tab, and enter the network SSID, as
shown in Figure 8.
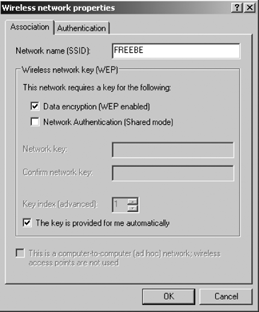
Ensure that the "Data
encryption (WEP enabled)" checkbox is checked. Select the Authentication
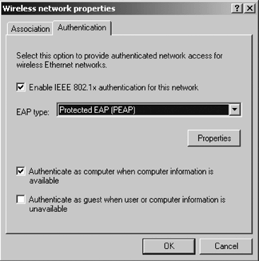
tab and ensure that the "Enable IEEE 802.1x authentication for this
network" checkbox is selected. Use the "EAP type" drop-down list to
select Protected EAP (PEAP) or "Smart Card or other certificate," as
shown in Figure 9.
Click the Properties button. If
a "Smart Card or other certificate" will be used for client
authentication, first ensure that the "Validate server certificate"
checkbox is checked. If multiple RADIUS servers are used, enter the
portion of the RADIUS server DNS name that is common for all servers in
the "Connect only if server name ends with:" box. Select the trusted
root certificate in the Trusted root certificate authority drop-down
list. The list of available certificates corresponds to the certificates
stored in the computer's certificate store. If the username required
for authentication is different than the one listed on the client
certificate, then select "Use a different user name" for the connection
checkbox. When prompted, select the client certificate from those
presented.
If PEAP is selected,
first ensure that the "Validate server certificate" checkbox is checked.
Click the "Connect to these servers" box and enter the name of the
RADIUS server. Select the "Trusted root certificate" in the "Trusted
root certificate authority" list. The list of available certificates
corresponds to the certificates stored in the computer certificate
store. Use the Select an Authentication Method drop-down list to select
Secured password (EAP MS-CHAPv2), as shown in Figure 10.
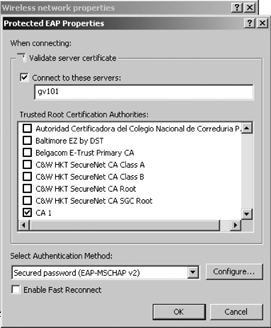
Click the Configure button
to open the EAP MS-CHAPv2 Properties window. Uncheck "Automatically use
my Windows logon name and password (and domain if any)." This will
require the user to manually enter credentials before connecting using
the wireless access. Furthermore, it will prevent connections by
unauthorized personnel if the client computer is left unattended while
the user is logged on. Click OK as many times as necessary to close the
Network Connections property pages.
After
a user connects to a wireless network using PEAP, his or her user
credentials are stored in the registry and used to reauthenticate to the
wireless network even after a reboot. To remove these credentials, use
the registry editor and delete the following key (of course, using
normal registry editing precautions): HKEY_CURRENT_USER\Software\Microsoft\Eapol\UserEapInfo. |
|
4. Understanding and Using WPA
Wi-Fi Protected Access (WPA) is specified in the IEEE 802.11i wireless networking standard. Table 2 shows WPA specifics.
Table 2. WPA security specifics
| Item | Requirements |
|---|
| Authentication | 802.1x. |
| Key management | Rekeying of both unicast and global encryption keys. |
| Unicast encryption key | Temporal Key Integrity Protocol
(TKIP) is used to change the unicast encryption key for every frame and
synchronizes changes between the wireless client and the WAP. TKIP
replaces WEP. |
| Global encryption key | The wireless AP advertises the changed key to the connected wireless clients. |
| Integrity | The Michael method calculates an 8-byte message integrity code (MIC). |
| Replay protection | A
new frame counter in the 802.11 frame is used by MIC to help prevent
replay attacks. (If a frame, identified by this counter has already been
received, the frame will be dropped.) |
| Encryption | WPA specifies support for the Advanced Encryption Standard (AES) is optional. |
| Support for mixed WEP and WPA clients | During
migration to WPA, a mixed client base of WPA and WEP clients can be
supported. The WAP identifies which protocol the client is using. The
global encryption key cannot be dynamic because WEP clients cannot
support it. Other benefits are maintained (including integrity). |
Wireless access
points, network adapters, and client programs must support WPA. It may
be possible to upgrade wireless access points and network cards via
firmware updates provided by their manufacturers. Both access points and
network cards must support the new WPA information element. They should
be configured for WPA to support WPA two-phase authentication (EAP or
RADIUS with 802.1x), TKIP, and Michael. Support for AES is optional.
Windows clients will
require an updated network card driver that supports WPA. Windows XP and
Windows Server 2003 clients require the driver to be capable of passing
the adapter's WPA capabilities and security configuration to the Wireless Zero Configuration Service. In many cases, the updated driver (when installed on the client) will update both firmware and the network card driver.
Windows client
software must be updated to permit configuration of WPA authentication,
as well as shared key and WPA encryption algorithms (TKIP and optional
AES).
Securing wireless
access to your networks is a critical step in securing your networks.
This section has detailed how to do so using IAS. By now, you can see
how complex and detailed IAS configuration can be. No matter how you use
IAS, it is extremely important to back up the configuration information
so that you can more easily restore
remote access operations in the case of server failure or other disaster. The next section applies to all uses of IAS.