3. Customizing the Places Bar
Most file-based applications in Windows Home Server
use the common Save As dialog box that’s employed to save a file in an
application (usually by selecting File, Save or by pressing Ctrl+O for a
new, unsaved file, or by selecting File, Save As for a saved file). The
common Save As dialog box is a scaled-down version of Explorer, so it
presents an easy and familiar interface.
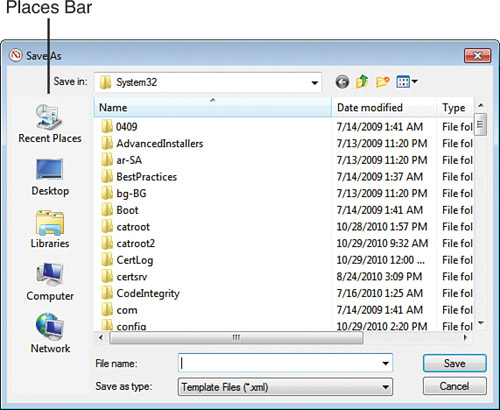
However, many legacy applications use an older version of the Save As dialog box that looks like the one shown in Figure 6.
Note
The same Places Bar also appears in the older version
of the common Open dialog box, which appears when you select File, Open
or press Ctrl+O when using a legacy application.
Notice in Figure 20.6
that the left side of the common Save As dialog box contains a strip
called the Places Bar, which contains icons for five shell folders:
Recent Places, Desktop, Libraries, Computer, and Network. These icons
are handy navigation tools, but only if you use the default folders.
Fortunately,
if you have other folders that you use more frequently, you can use a
group policy to customize the Places Bar icons. You can replace the
existing Places Bar icons with up to five items, which can be any
combination of the following:
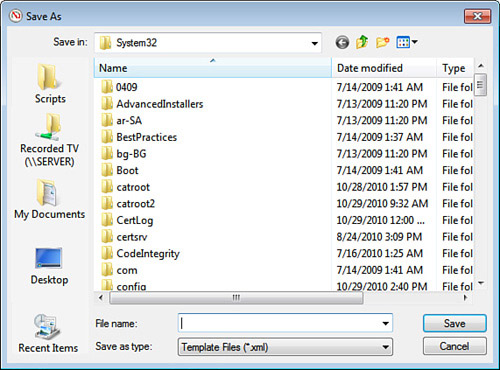
A local folder path— For example, someone who writes a lot of scripts for Windows Home Server might set up a Scripts folder within My Documents. In that case, you could add %UserProfile%\My Documents\Scripts
to the Places Bar. Note that in this case, only the name of the
subfolder appears in the Places Bar. (That is, you don’t see the entire
folder path.)
A UNC path to a shared network folder—
For example, this would be ideal for accessing those Windows Home
Server shares that you use most often. In this case, Windows Home Server
displays the Places Bar icon with the name Share on Computer, where Share is the name of the shared folder and Computer
is the name of the computer that’s sharing the folder. (The exception
to this is when you add a subfolder of the share to the Places Bar. In
that case, you see just the subfolder name.)
A Windows Home Server shell folder— The following table lists some of the common shell folders.
| Shell Folder | Path |
|---|
| CommonDocuments | %Public%\Public Documents |
| CommonMusic | %Public%\Public Music |
| CommonPictures | %Public%\Public Pictures |
| Desktop | %UserProfile%\Desktop |
| MyComputer | Computer folder |
| MyDocuments | %UserProfile%\My Documents |
| MyFavorites | %UserProfile%\Favorites |
| MyMusic | %UserProfile%\My Music |
| MyNetworkPlaces | %AppData%\Microsoft\Windows\Network Shortcuts |
| MyPictures | %UserProfile%\My Pictures |
| Printers | Control Panel, Printers |
| ProgramFiles | C:\Program Files\ |
| Recent | %UserProfile%\Recent |
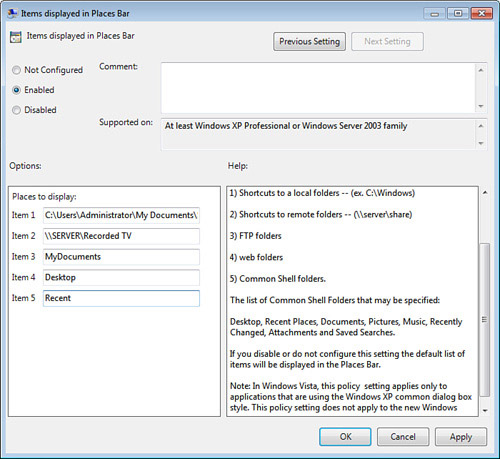
Follow these steps to use a group policy to customize the Places Bar:
1. | Open the Local Group Policy Editor window.
|
2. | Navigate
to the User Configuration, Administrative Templates, Windows
Components, Windows Explorer, Common Open File Dialog branch.
|
3. | Double-click the Items Displayed in Places Bar policy.
|
4. | Activate the Enabled option.
|
5. | Use
the text boxes in the Places to Display section to specify the local
folders, network paths, or shell folders that you want to include in the
Places Bar.
|
6. | Click OK.
|
Figure 7 shows the Items Displayed in Places Bar policy enabled and with some custom items added, and Figure 8
shows the resulting Places Bar in the legacy common Save As dialog box.
(The same customized Places Bar also appears in the legacy common Open
dialog box.)
Note
If you don’t use the Places Bar at all, you might
prefer to hide it to give yourself more room in the legacy Open and Save
As dialog boxes. To do that, open the Local Group Policy Editor and
navigate to the User Configuration, Administrative Templates, Windows
Components, Windows Explorer, Common Open File Dialog branch.
Double-click the Hide the Common Dialog Places Bar, click Enabled, and
then click OK.